[Top] [Prev] [Next] [Bottom] [Contents]

Document Manager

The Document Manger is the place where the project's HTML documents are manipulated. HTML files can be created, modified, imported, previewed, refreshed and deleted using the Document Manager.

States of the interface

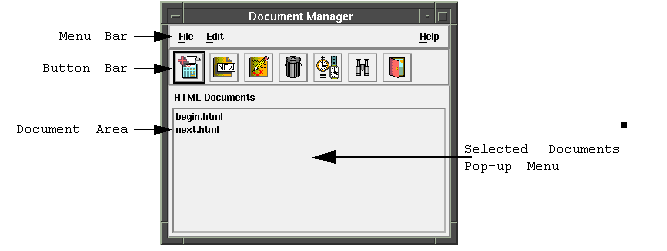
Figure 2-3 Document Manager

About the Interface

Area Description
Menu Bar Pulldown menu options.
Button Bar Quick access buttons to common interface operations.
Document Area This list contains all of the HTML documents associated with the current project.
Selected Documents Pop-up Menu This menu can be invoked by pressing mouse button 3 while the pointer is over the Document Area. These menu options allow the user to manipulate the HTML document that is selected in the Document Area.

Pulldown Menus

File

Option Description
Add Add allows the user to add existing HTML documents to the project.
Create Create allows the user to invoke the HTML editor of choice to create a new HTML document for the current project.
Close This closes the interface.

Edit

Option Description
Edit Edit invokes the user's favorite HTML editor with the selected document in the Document Area already loaded.
Delete Delete removes the document that is selected in the Document Area from the current project. It does not delete the file from the UNIX file system. This option also removes any activators and binding information associated with the deleted HTML document.
Refresh Refresh checks the UNIX file system to see if any of the current project's HTML document files have been modified since the last check. If they have, the project will be updated to reflect the modifications. This happens automatically in most cases, but can be performed manually through the Refresh Option.
Preview Preview invokes the user's HTML browser with the selected document in the Document Area already loaded.

Help

Option Description
About Displays the About Sapphire/Web Dialog.
Interface Provides on-line help for the Document Manager interface.

Pop-up Menus

Selected Documents

Option Description
Add Add allows the user to add existing HTML documents to the project.
Create Create allows the user to invoke the HTML editor of choice to create a new HTML document for the current project.
Edit Edit invokes the user's favorite HTML editor with the selected document in the Document Area already loaded.
Delete Delete removes the document that is selected in the Document Area from the current project. It does not delete the file from the UNIX file system. This option will also remove any activators and binding information associated with the deleted HTML document.
Refresh Refresh will check the UNIX file system to see if any of the current project's HTML document files have been modified since the last check. If they have, the project will be updated to reflect the modifications. This will happen automatically in most cases, but can be performed manually through the Refresh Option.
Preview Preview invokes the user's HTML browser with the selected document in the Document Area already loaded.

Button Bars

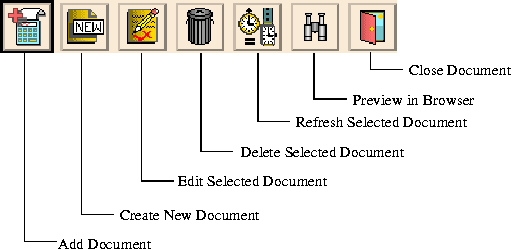
Figure 2-4 The Document Manager Button Bar

Option Description
Add Add allows the user to add existing HTML documents to the project.
Create Create allows the user to invoke the HTML editor of choice to create a new HTML document for the current project.
Edit Edit invokes the user's favorite HTML editor with the selected document in the Document Area already loaded.
Delete Delete removes the document that is selected in the Document Area from the current project. It does not delete the file from the UNIX file system. This option will also remove any activators and binding information associated with the deleted HTML document.
Refresh Refresh checks the UNIX file system to see if any of the current project's HTML document files have been modified since the last check. If they have, the project will be updated to reflect the modifications. This happens automatically in most cases, but can be performed manually through the Refresh Option.
Preview Preview invokes the user's HTML browser with the selected document in the Document Area already loaded.
Close Closes the Interface.

Hover Help

When the mouse pointer is held over a button on a Button Bar, a status message is displayed that provides a brief description of that button's action.

How to Invoke the Interface

1. The Project Window's Tools Menu
2. The Project Window's Main Button Bar
3. The Tools Menu of the Object Editor
4. The Tools Menu of the Object Bind Editor

Adding Existing HTML Documents

To Add HTML Documents to the current Project, follow these steps:

1. Choose the Add option from the File Menu, Button Bar, or Selected Documents Pop-up menu. The Add Document Dialog will appear.
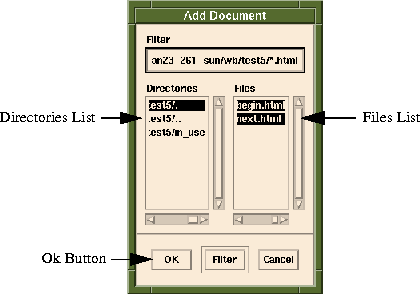
Figure 2-5 The Add Document Dialog

2. Locate the directory where the documents exist by using the Directories List.

3. Select the document(s) to add to the project from the Files List. This can be done by dragging the mouse pointer across the desired documents or holding down the <Control> key and selecting each desired document individually.

4. Press the Ok Button and the documents are now a part of the current project.

Changing Filter Extension

To change the default filter extension from ".html", modify the Project.Default HTML Extension to the desired file extension.

Creating a New HTML Document

To create a new HTML Document in the current project choose the Create option from the File Menu, Button Bar, or Selected Documents Pop-up menu. The Add New HTML Dialog will appear:
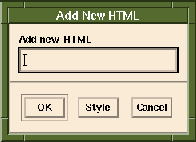
Figure 2-6 The Add New HTML Dialog

Definition of a Style

A style is simply an HTML document that can be used as a template for creating new HTML documents.

The styles can come from either the $SAPPHIRE/config/htmlstyle directory of the Sapphire/Web distribution, or a user-defined directory. To define the location to find Styles, change the Project.HTML Style Directory Project Option.

Styles can save time by allowing the user to select a style with common headers, footers or contents already in place. This alleviates the user from doing cut-and-paste operations or copying files.

Development teams can enforce corporate style guides by using styles. Simply create a common directory and copy all of the styles into it. Then, change the $SAPPHIRE/config/Sapphire.cfg file to point to the new directory. If users have their own copies of the Sapphire.cfg file in their home directories, they can simply change the Project.HTML Style Directory option in the Project Options and select Save Options from the Project Window's Edit Menu. This allows all members of the team to use the same styles.

Using the Default Style

1. To create a new document using the Default Style, simply type the desired name for the new file in the textField.

2. Now press Ok. This will invoke the user's HTML editor and load the new file that contains the Default Style.

Selecting Styles

1. To use a style, enter the desired name for the new filename in the textField of the Add New HTML Dialog.

2. Now press the Style Button. The Select HTML Style dialog is invoked:
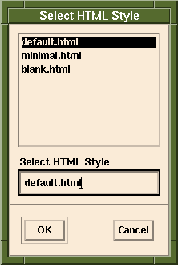
Figure 2-7 Select HTML Style Dialog

3. Select the appropriate style from the list of styles.

4. Now press the Ok button. This will invoke the user's HTML editor and load the new file that contains the selected style.


[Top] [Prev] [Next] [Bottom] [Contents]

info@bluestone.com
Copyright © 1997, Bluestone. All rights reserved.